
 I'd like to consider it Christmas in July! With the holiday season fast approaching I thought I'd bring back a project, a darling electric candle PERFECT for the holiday season!!! There are so many great cookie cutters you can use and so many awesome scents to coordinate this is a great product for all your upcoming holiday shows!Most of the "Electric Grubby Candles" being
sold today are made from silicone molds, but you can make them with just a
regular candle mold as well. These beautiful candle lights are a fairly simple
project but can get "messy" and are time consuming. The results are fantastic
and WELL worth the time and effort! This particular electric candle will easily sell in my market for between $25-30!
I'd like to consider it Christmas in July! With the holiday season fast approaching I thought I'd bring back a project, a darling electric candle PERFECT for the holiday season!!! There are so many great cookie cutters you can use and so many awesome scents to coordinate this is a great product for all your upcoming holiday shows!Most of the "Electric Grubby Candles" being
sold today are made from silicone molds, but you can make them with just a
regular candle mold as well. These beautiful candle lights are a fairly simple
project but can get "messy" and are time consuming. The results are fantastic
and WELL worth the time and effort! This particular electric candle will easily sell in my market for between $25-30!
What you will need to make this:
- IGI 1260 Straight Paraffin Wax
- Mold Release Powder
- Silicone Mold Release Spray
- Soybean Oil
- Vybar 103
- Christmas Green Diamond Dye Chips
- Mistletoe Fragrance Oil
- 6" Country Candle Lamp with Silicone Bulb Light
- Pine Tree Cookie Cutter
- Any round mold that is at least 5" in diameter and should be about 4-5" in height. We used the 5" x 5.5 seamless aluminum mold. You could also use molds with seams for this project as they will be covered with whipped wax.
- A digital scale to weigh both your wax and your fragrance oil.
- A thermometer take the temperature of the wax as it is heating.
- Presto Pot or Double Boiler Maker to Melt the wax (A Presto Pot is strongly recommended for this wax due to it's high melt point).
- Pouring Pot
- Exacto Knife
- Wire Whisk
- Butter Knife
- Mold Plugs & Mold Sealer Putty
Getting Started!
Prepare your work surface covering anything you do not want wax on! This can get messy!
Once you get yourself set up, begin
melting your wax. For our mold it took about 3.5 pounds of wax (by weight).
Once your wax is melted, add 3.5 tsp of the mold release powder, and 3.5
tbsp soybean oil to the wax. Allow additives to melt and blend well.
Prepare your mold by plugging any
wick holes with mold plugs and covering those with mold sealer putty to
prevent leakage. Spray the inside of the mold with silicone mold release.
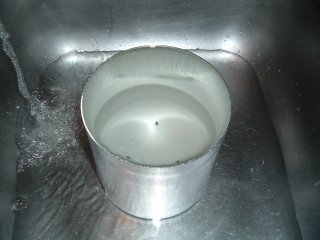
Bring your melted wax up to 200*F and pour the hot wax into your molds. (We
poured our candles into a sink so that they could be rapid cooled by
submerging the candle mold into cold water. This will allow the candle shell
to cool much faster.)
Empty Mold

Filled Mold Cooling

Once your candle has a visible shell
up the sides of the mold of about 3/4" thickness, remove the mold from the
water. Take a butter knife and remove the skim of wax from the top of the
molds and pour the remaining wax back into either your Presto Pot or your
Pour Pot.
Wax In Mold Ready

Taking Skim off Wax

Allow shell to fully harden and
carefully remove it from the mold.
Top View Finished Shell

Side View Finished Shell


Using an exacto knife, cut a hole
in the bottom of the shell near an edge. This hole must be big enough
for the electrical plug of the candle lamp to fit through it. Make
sure the plug fits through the hole before moving on to the next step.
Cutting Cord Hole


Cutting Cord Hole


Now, take about 1 pound of the
leftover wax you have melted and heat it back up to about 175*F. Add
1 teaspoon of vybar 103, two of the Christmas Green Dye chips and 1 oz of
Mistletoe Fragrance oil and blend well. Allow the wax to cool and form
a "skim" of wax over the top and begin using your wire whisk to "whip" the
wax.
Once your wax has been whipped to the
consistency of frosting, use your butter knife to "frost" your candle shell
with the whipped wax until you have it well coated.
Applying Whipped Wax

Applying Whipped Wax

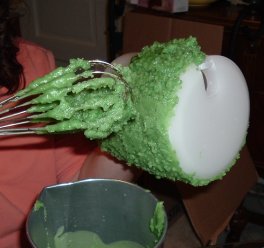
Applying Whipped Wax

The cut out shapes must be done
quickly before the whipped wax fully hardens. Set the shell on a level
surface, holding one hand inside the shell, use the other hand to press the
cookie cutter into the front side of the shell. Press firmly through
the whipped wax until you feel the cutter hit the solid shell, then stop.
Remove the cutter carefully, then very carefully peel the wax shape out.
You will be left with a tree shaped cut out for light to glow through!
Next just set the candle lamp inside
the shell, and run the cord through the hole. You are done!
Finished Lamp

Creative
Decorating & Packaging Ideas:
- Try adding a little glitter or mica to the finished project for added sparkle!
- Tie some homespun fabric around the candle for an added primitive touch!
- Get creative with cookie cutter shapes, colors and fragrances. Try a gingerbread man cut out with some spices sprinkled on the whipped wax! How about making the shell a pastel blue, and using white whipped wax, glitter, and a snowflake cut out and scenting it Frost Bite or Jack Frost?
- Electric Grubby Candles look great packaged in a clear cello bag tied with ribbon, raffia, twine or yarn!
- These make cute night lights!
Happy Candlemaking!
Have a safe and happy 4th of July!
Flicker
Have a safe and happy 4th of July!
Flicker
No comments:
Post a Comment
Note: Only a member of this blog may post a comment.