
~Marble Container Candles~
(Made with EZ Parasoy wax)
Put a colorful new twist on plain container candles!
Materials you will need:
~ Container candle making supplies, or already prepared solid colored container candles (I made my own candles made with EZ Parasoy wax)
~ Heat Gun
~ Toothpick diameter 6" piece of wire
~ Bowl of ice water (optional)

Step 1 - Choose your base container candle. When selecting a container candle to marble, choosing a soy blended wax is ideal, due to the softness of the wax.
*Note: The softer the wax, the more likely the colors are, to fading into each other over time. A 100% soy wax will morph into one color in about a week, losing the marbled look.

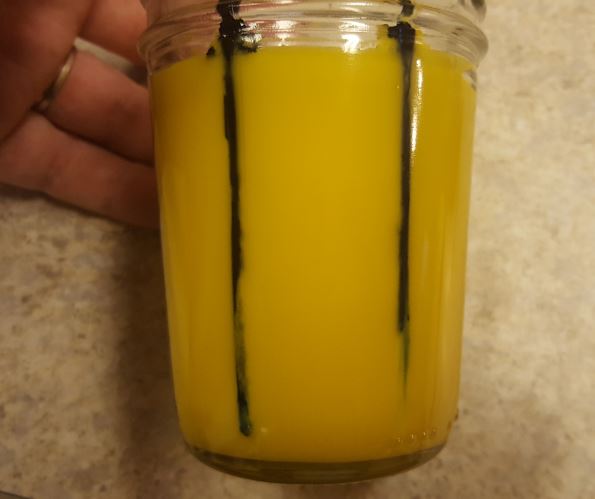
Step 2 - Taking a completely cooled and prepared container candle, use the toothpick diameter 6" piece of wire to poke multiple holes along the glass, until you reach the bottom of the container. It's not recommended to poke too many holes (about 6 maximum), to prevent the dye from flooding the base candle into one new color.


*Note: Make sure to clear all wax from the hole that you have just created. This will allow the liquid dye to disperse easier down the candle.

Step 3 - Take the liquid candle dye and apply one drop of dye to each hole that you made along the sides of the candle. One drop is all you need to make nice color swirls in the base candle.


Step 4 - The drops of dye usually do not spread all the way to the bottom of the candle on their own, which is where the metal wire comes into play again. Use the metal wire to follow the original punctures, to force the dye all the way to the bottom of the candle.

Step 5 - After all lines of dye have been forced to the bottom of the container, use a heat gun to start on one line at a time. Focusing on just one line of dye, slowly follow the line of dye with the heat gun in a sweeping motion back and forth. As soon as you see the wax starting to melt, you'll notice the dye quickly moving along the melted area.
*Note: This is where I found a helpful trick. Sometimes if heated too much where a bit too much wax is melted, the dye will flood the melted area in a fairly large amount rather quickly. Using a bowl of ice cold water, as soon as you see where the dye is flooding a bit too much, stop the heat gun and quickly place your container candle into the bowl of water just until it is level with the surface of the wax within the container. This will "freeze" the design without morphing your entire candle into one color.


The marble designs become very pretty, very quickly :)


Step 6 - When you have completed all sides of your candle, you'll see that the surface of your candle is a bit "less than satisfactory". There will be dye, wax bits and a whole lot of uneven surfaces. Wait until the candle is completely cooled, then using your heat gun in a circular motion, heat the candle surface just until the surface is completely flat.


Step 7 (final step) - Once the surface is completely cooled, take a napkin or paper toweling to carefully follow along just above the surface, to clean up any wax or dye for a neat, clean look.


Secure a lid to each candle for the finishing piece. These candles are simply beautiful!


If there is a fun Candle or Bath & Body product that you would like seen made, we would love to hear from you!
Please send your requests to info@candlesupply.com
Happy Candle Making!
-Elya