Thursday, May 30, 2019

Summer Time Luminaries!

~Summer Time Luminaries~


Who doesn't like to play with water balloons on hot summer days?
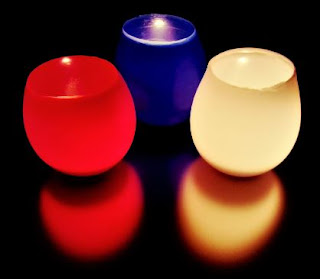
Learn how to make beautiful luminaries with just wax and, you guessed it.. Water Balloons!


Materials needed:
- Water Balloons
- Cookie Sheet
- Candle Dye (Optional if you'd like them colored)


Fill a water balloon with water (room temp or cool water is okay)


Melt wax to 170°-180°


Slowly dip the water-filled balloon into the melted wax, just below (roughly 1/2") the water level within the balloon. 
*Note: Do NOT dip the balloon into the wax above the water level that is within the balloon. The hot temperature of the wax will likely cause the balloon to break.


Dip the balloon every few seconds, allowing the wax-covered balloon to cool a bit between each dip. 


While the wax covered balloon is still warm, set the balloon down on a cookie sheet or heat-resistant surface, while holding the end of the balloon, making sure that the balloon is level, as this will create a flat bottom for the luminary. 


Continue to dip the balloon a few more times until the wax has reached the desired thickness. A thickness of right around 1/4" is ideal.


Set the balloon on a heat-resistant surface once again and allow to fully cool.


Once completely cooled, hold the balloon over a sink of bucket and carefully pop the balloon to allow the water to drain. 
*Tip: I popped the balloon at the very end by where I was holding it, so I could hold it away from me and allow it to slowly drain without bursting everywhere. :)


Dispose of any left over broken balloon pieces.


To achieve a smooth and level surface on the luminary, heat a cookie sheet on the stove (or like I did, use a heat gun to heat a metal candle plate) and place the luminary top-down onto the hot surface to carefully melt the edges evenly across.


Place a tea light or battery-operated candle within the luminary for a beautiful glow in a dark area. 


*Note: For colored luminaries, add a bit of candle dye to the wax before dipping the balloon.


*Note: To add natural pieces to your luminary such as pine needles or dried flowers, apply the dried pieces to the sides of the luminary in between dips while the wax is still hot. The pieces will stick to the wax before it dries. Be sure to dip the following layer of wax rather quickly to prevent the natural pieces from sliding off into your melted wax!


If there is a fun Candle or Bath & Body project that you would like to learn about, we would LOVE to hear from you! Please send all requests to info@candlesupply.com. Thank you!
Happy Candle & Soap Making!
-Elya 


Monday, April 29, 2019

DIY Coconut Oil Salt Scrub!

~DIY Coconut Oil Salt Scrub~

Battling dry skin no longer has to be a daily task. 
This Do-It-Youself Coconut Oil based Salt Scrub recipe is simple and effective, while leaving your skin feeling silky and moisturized for days!


Materials needed:


In a medium bowl, combine Epsom Salt, Fragrance Oil & a few drops of your favorite Bath & Body Colorant to your preference. (For this, I used both Orange and Blue Colorants). 


Add Coconut Oil to Salt mixture. *Mix thoroughly with a spoon, for about 3 minutes*


*Quick Tip - To add even more exfoliating properties to your Salt Scrub, try adding a few dried Lavender or Rose Buds.  Shop Lavender & Rose Buds here


Store Salt Scrub in a Glass container with an air-tight lid. 


*Note - The Coconut Oil in this recipe may leave a slippery film on the bottom of your shower/tub. Make sure to thoroughly rinse the shower/tub with hot water once you are done to prevent slipping.

*Quick Tip - Sensitive skin? No problem! Replace the Fragrance Oil in this recipe with 20-25 drops of your favorite skin-safe Essential Oil for all natural nurturing properties!


If there is a fun Candle or Bath & Body project that you would like to learn about, we would LOVE to hear from you! Please send all requests to info@candlesupply.com. Thank you!


Happy Candle & Soap Making!
-Elya


Sunday, March 31, 2019

Air Freshener Blank Iron-On Transfers!

~Air Freshener Blank Iron-On Transfers~
 
Our popular Air Freshener Blanks are extremely popular year-round. 
These blanks are able to be scented in any fragrance you desire, while sporting your company's logo or a catchy phrase while hanging in your vehicle, home or office!


Materials needed:
-Iron-On T-shirt transfer paper (such as AVERY Ink Jet T-shirt Transfers)
-Clothing Iron


Step 1: Using the Word document program, create your text, photo, or graphic transfer design that you wish to use on your Air Freshener Blanks. 

*IMPORTANT! When you're happy with your transfer design, flip the image, using your software program or your printer. If you do not flip the image, the text will appear backwards when you iron the image on the Air Freshener Blank. If you need an image flipped, you can flip the image for free at www.flipapicture.com within seconds. 


                          ^BEFORE^  (incorrect)                           ^AFTER^ (correct)
               

Step 2: Make sure you print a test page on regular printer paper before printing onto the transfer paper. Printing a test page will allow you to judge whether your transfer design is the right size for the Air Freshener Blank that you plan to apply the transfer to, as well as to make sure that the image is correctly flipped so all text is correct. Holding the Air Freshener Blank over the transfer design, or holding up both the transfer design and the blank to a light or window will also work well.

*NOTE - The brighter the picture, the more clear the picture will transfer. Darker colors such as brown and blacks will tend to blend together rather than stand out.


Step 3: While working on a hard smooth surface that can withstand high heat, place a sheet of thin material, such as a pillow case between the hard surface and the Air Freshener Blank that you will be using with the transfer design.


Step 4: The Air Freshener Blanks are made from an absorbent compressed paper material. The ink that is applied to the transfer paper from your printer, will essentially be melted by the heat of the iron, into the surface material of the Air Freshener Blank.


Step 5: Using an Air Freshener Blank that has been scented and allowed to COMPLETELY dry for a few days, place the transfer design ink-side down, onto the Air Freshener Blank evenly along all edges. Using the iron, firmly press down onto the transfer and Air Freshener Blank for 2-3 seconds. Actually saying "One Mississippi, Two Mississippi, Three Mississippi" is the appropriate time frame at which the iron should be directly pressed onto the transfer without releasing. Holding the iron onto the Transfer and Air Freshener Blank longer than this should not be necessary.

*NOTE: Applying fragrance oil to an Air Freshener Blank that has already had a transfer applied to it, may cause the ink of the transferred image to smear, run or quickly fade.


Step 6: Once you have applied the Transfer to the Air Freshener Blank, allow the Transfer and Blank to completely cool to room temperature before you attempt to remove the transfer paper film that covers the transfer design. Once cooled, carefully start peeling the paper film back at one of the corners. The film will sometimes come off with a bit of pressure, rather than quickly releasing from the design. CAREFULLY pull the transfer paper film back from the design.


Step 7: Poke a hole and attach an elastic cord for hanging, and you're all done. These package nicely in Resealable Cello Bags with a cute sticker for resale!


If there is ever a fun Candle or Bath & Body product that you would like seen made, we would love to hear from you! Please send your requests to info@candlesupply.com.
Happy Candle & Soap Making!
-Elya


Thursday, February 28, 2019

Fresh & Clean Carpet Refresher!

~Fresh & Clean Carpet Refresher~


You'll be surprised to find
that refreshing your carpet can be as easy as 1-2-3!


Materials you will need:
- 3 cups Baking Soda
-Small mixing bowl
-Fork or whisk 


 Step 1 ~
Combine Fragrance Oil (I used Lavender Lullaby & Rosemary Mint BNL) & Baking Soda in a small mixing bowl. Mix thoroughly using a fork or whisk


Step 2 ~
Using a spoon, carefully scoop the mixture into the shaker bottles. The shaker bottles are 1.75" wide and 5.25" tall. These bottles easily hold up to 7oz (be weight) of powder.


Step 3 ~ 
Apply powder liberally to carpets. Allow powder to set for 1-2 hours. 
*Note: For even better results, allow powder to set overnight. 


Step 4 ~
Vacuum thoroughly. You may want to make an additional pass with the vacuum, to make sure that all powder has been removed from the carpet. 


There are endless fragrance variations, for just about any occasion. Here are just a few for examples from our fragrance line:


Summertime Bliss (Great for a pick-me up during those dog days of summer)
-.5oz Ocean Mist


Minty Madness (Soothing for headaches)
-.5oz Frost Bite


Woods/Outdoors (Ideal for any nature lover)
-.25oz Patchouli & .25oz Lavender 
-.25oz Patchouli & .25oz Vanilla Velvet
-.25oz Sandalwood & .25oz Vanilla Extract 
-.25oz Birch Bark & .25oz Leather


Springtime/Floral (Perfect for the exciting time of spring!)
-.5oz Lavender
-.5oz Mulberry


Christmas/Holidays (wonderful for ringing in that Christmas Joy)
.25oz Pine Plantation & .25oz Cedar Wood


Herbal


If there is ever a fun Candle or Bath & Body product that you would like seen made, we would love to hear from you! Please send your requests to info@candlesupply.com.
Happy Candle & Soap Making!
-Elya


Thursday, January 31, 2019

Spring Votive Bouquet!

~Spring Votive Bouquet~


With Spring right around the corner, it's all about FLOWERS!
Votive bouquets are a fun, delicate project to take on for the season. 
Color them to match certain decor, fragrance them for a special occasion, or leave them unscented to use specifically as a beautiful decoration piece. 


Materials you will need:
-Twist Ties ( I used the Gold)
-20mm B, 10mm N, 3mm H Wick Tabs (These fit the AromaMagic Wands perfectly)
-Raffia Ribbon (Numerous colors to choose from)
-Hot Glue Gun
- Flower Vase


Step 1 - Depending on how big your flower vase is, and how full you'd like it to look, make as many votive candles as you wish, using the Votive Instructions on our web site. I used the Feather Blend Palm wax, as it is very pretty, without the need for any extra additives.


Step 2 - Once all your votives are made, now is the fun part... on the bottom of each votive, you will need to clear out any wax that is beneath the wick tab. This will create a smooth surface for another wick tab to be applied to, in the following steps. Using a butter knife of anything with a firm edge, is a useful tool for removing any wax that may be in the way. 


Step 3 - Using an AromaMagic Wand, and one wick tab, insert the AromaMagic Wand into the wick tab, through the top of the tab, as shown below. 


Step 4 - Using the hot glue gun, apply a small pea-size amount of glue to the bottom of the wick tab that the AromaMagic Wand has been inserted to. Apply this tab directly to the bottom of the wick tab from the Votive candle. Allow hot glue to cool for 5 minutes.


Step 5 - While waiting for the hot glue to fully cool on the wick tabs, use a scissors to make a single 1/2" cut up the middle of the very bottom edge of the 3x5" Clear Cello Bag. Prepare one cello bag for each votive you have. Once all cello bags are prepared, place the opposite end of the AromaMagic Wand into the Cello Bag, and through the 1/2" cut that you just created. 


Pull the Cello Bag all the way up until it has covered the votive candle. 


Step 6 - Using a Twist Tie, tie off the open end of the Cello Bag, around the top of the Votive Candle. 


Step 7 (final step) - To make for a cleaner look, use the hot glue gun again, to glue down the bottom edges of the Cello Bag. Now would be a good time to glue Silk Rose Leaves to the bottom of the cello bag as well, to add even more detail. 


Now that your votive candles are all covered and completed, 
go ahead and arrange them within your flower vase. The Silk Rose Leaves will add a sense of greenery to the arrangement, to give it even more of a floral look. 

Note: If you're wanting more firmer sticks, rather than the AromaMagic Wands, the sturdier Wooden Skewers in the BBQ section at your local grocery store will work wonderfully and will not bend, like the AromaMagic Wands will tend to do. 


If there is ever a fun Candle or Bath & Body product that you would like seen made, we would love to hear from you! Please send your requests to info@candlesupply.com.

Happy Candle & Soap Making!
-Elya