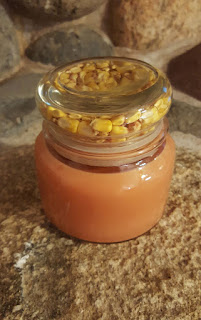
Autumn Apothecary Jars!
Apothecary Jar Candles are a great item to have on-hand for any time of year, with their endless potential. Customize them for the season, or add a personal touch to give as a memorable gift!
So here we go!
Materials you will need:
*Container wax (I used the EZ ParaSoy)
*Fragrance (I used Autumn Leaves BNL for the green, and Candy Corn for the orange)
*Candle Dye (I used the Hunter/Moss and the Pumpkin/Spice Liquid Candle Dyes)
* Apothecary Jar ( used the 12oz)
*Bubble Lid for the Apothecary Jar
*Wick (I used the CD serieshttp://cart.candlesupply.com/Heinz-Stabilo-Coreless-German-Wicks-CD-Series-Wicks-c-860.html)
*Filling for the Bubble Lid (I used leaves and dried corn)
First, start by melting your wax to 180*-195*.
Melting EZ ParaSoy wax
While waiting for the wax to reach its desired temperature, make sure you have an open work space with everything you need within arms' reach. We have a selection of Apothecary Jars to choose from, however for this blog, I chose to use the 12oz size.
12oz Apothecary Jar w/ Bubble Lid
When choosing the filling for the Bubble Lid, branch out and be creative! Whether it's candies or tinsel for the holidays, these are going to be so pretty! Being fall time here in the north, I gathered a few colorful leaves from outside as well as some dried corn. It's no wonder why this is my favorite time of year! Talk about beautiful!
Leaves for the Bubble Lid filling
Go ahead and fill the Bubble Lid with the filling that you have collected. The Bubble Lids have a soft plastic cover, so the filling won't drop out. It's sometimes handy to use a butter knife to remove the plastic cover, to fill the Bubble Lid, but not necessary. This is my favorite step of this project :)
Bubble Lid with open cover
Filling the Bubble Lid
Filled Bubble Lid
Wick secured with a Wick Stickum
By now, your wax should be ready. If the wax has reached the temperature of 180*-195*, go ahead and add your choice of candle dye and fragrance. Be sure to blend well! This wax should be poured between 165*-180* for optimal results.
Pouring EzParaSoy wax
Instead of adhering to the jars, this wax
will actually pull completely away, leaving a smooth finish around the
entire candle. However this wax will most likely need a slight top-off.
Smooth candle surface without second pour
Once your candle has completely cooled, trim the wick, and replace the Bubble Lid as the final step!
Autumn Leaves BNL scented 12oz Apothecary Candle
Candy Corn scented 12oz Apothecary Candle
These Apothecary Jar Candles are simple to make, and look fabulous on a shelf or corner table!
The possibilities are endless!
The finished product!
I hope this has given a few of you some new ideas to try out for the upcoming holiday season!
If there is ever a fun candle or Bath & Body product that you would like seen made,
Please send your requests to info@candlesupply.com. :)
Please send your requests to info@candlesupply.com. :)
Happy Candle & Soap Making!
-Elya


