Here is a tutorial on how to make whipped soap that actually floats!

The supplies are pretty standard to cold process soap making with the exception of one detail, you need to have a stand mixer like a Kitchen Aid or similar. I luckily inherited a lovely 1960's Sunbeam that can be put to use without risk of getting my good one messy!
Recipe for Flickers Whipped Soap:
Castor Oil 2 oz. (6.25%)
Coconut Oil 7 oz. (21.88%)
Olive Oil 7 oz. (21.88%)
Palm Oil 7 oz. (21.88%
Shea Butter 2 oz. (6.25%)
Crisco 7 oz. (21.88%)
The lye used in whipped soap is Sodium Hydroxide (NaOH) I find an excess fat range of 6% to be ideal when making whipped soap, the amount of Sodium Hydroxide for this recipe is 4.42 oz. You will add the lye to ICE COLD distilled water. Always be sure to follow proper handling precautions when making any soap from scratch. Proper eye, and hand protection is important. Using a respirator is never a bad idea either. For this recipe I use 12 fluid ounces of water. You MUST chill the lye solution before adding it to the soap. I find a range of 65-70* ideal.
Once your lye solution has reached a good temp, go ahead and line your soap mold. I use a standard 3 lb wood log mold which works very well for this size recipe. Remember since the oils are whipped the volume increases too.
Second, weigh out all your solid oils (shea, coconut, crisco & palm) and place them inside the mixing bowl. You do not need to heat your oils which is the nice part to making whipped soap! Turn your mixer on at this point on low (if you try much higher right away it will splatter!) Increase your speed as the oils begin to smooth out.

After your solid oils are somewhat smoothed out, weigh our your liquid oils (castor and olive).

Now go ahead and slowly add in your liquid fats.

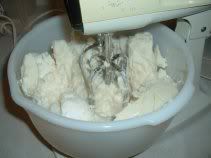
Patience is key when making whipped soap. It does not happen fast. The mixing process can take up to an hour but hey, at least you can put your mixer on auto pilot, right? This is a photo of the oils all blended together but not quite at the smooth point it needs to be to add the lye.

Once your oils are smooth and whipped you are ready to add your chilled lye solution. ADD THE LYE SLOWLY! I turn my mixer down to the lowest speed for this and add just a little at a time. After you are sure your lye solution is blended you can add your fragrance oil. I used two ounces of Dream Angels Heavenly Type (BNL) from Bitter Creek for this particular soap, it smells just dreamy! Here is a pic of your oils ready for lye!

After you've got your fragrance and lye mixed in it's time for color! I needed my base to be colored in blue and white to be a smaller portion of the soap. I scooped out the white into a small stainless bowl and set it aside.

Once I have separated my soap I can then color my base, for this soap I used the Blue Rainbow Mica from Bitter Creek North. I used about 3/4 tsp for this batch. Blend the dyes in by turning the mixer back on low until blended well.

Once you are ready, go ahead and mold! I used blue on the bottom, white in the center and blue on the top for a cloud like appearance. You can swirl, layer and do just about anything you can imagine with whipped soap!

Allow your finished soap to set in the mold for about 24 hours. Remove and cut with a wire. Standard soap cutters and knives tend to break pieces off as you cut. Cure this soap for about 4 weeks before selling.
Happy Soaping!
Flicker

No comments:
Post a Comment
Note: Only a member of this blog may post a comment.