Thursday, January 29, 2009

Soap Floats!!

I love creating soap more than just about anything else. A while back I made my first batch of whipped soap and before I even had it on my site my friends and family wiped me out! I've decided to stick to selling just CP wholesale but the whipped soaps are such fun that I have to retail them!

Here is a tutorial on how to make whipped soap that actually floats!
Photobucket

The supplies are pretty standard to cold process soap making with the exception of one detail, you need to have a stand mixer like a Kitchen Aid or similar. I luckily inherited a lovely 1960's Sunbeam that can be put to use without risk of getting my good one messy!

Recipe for Flickers Whipped Soap:
Castor Oil 2 oz. (6.25%)
Coconut Oil 7 oz. (21.88%)
Olive Oil 7 oz. (21.88%)
Palm Oil 7 oz. (21.88%
Shea Butter 2 oz. (6.25%)
Crisco 7 oz. (21.88%)


The lye used in whipped soap is Sodium Hydroxide (NaOH) I find an excess fat range of 6% to be ideal when making whipped soap, the amount of Sodium Hydroxide for this recipe is 4.42 oz. You will add the lye to ICE COLD distilled water. Always be sure to follow proper handling precautions when making any soap from scratch. Proper eye, and hand protection is important. Using a respirator is never a bad idea either. For this recipe I use 12 fluid ounces of water. You MUST chill the lye solution before adding it to the soap. I find a range of 65-70* ideal.

Once your lye solution has reached a good temp, go ahead and line your soap mold. I use a standard 3 lb wood log mold which works very well for this size recipe. Remember since the oils are whipped the volume increases too.

Second, weigh out all your solid oils (shea, coconut, crisco & palm) and place them inside the mixing bowl. You do not need to heat your oils which is the nice part to making whipped soap! Turn your mixer on at this point on low (if you try much higher right away it will splatter!) Increase your speed as the oils begin to smooth out.
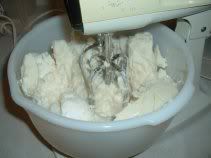
Photobucket

After your solid oils are somewhat smoothed out, weigh our your liquid oils (cas
tor and olive).
Photobucket

Now go ahead and slowly add in your liquid fats.
Photobucket

Patience is key when making whipped soap. It does not happen fast. The mixing process can take up to an hour but hey, at least you can put your mixer on auto pilot, right? This is a photo of the oils all blended together but not quite at the smooth point it needs to be to add the lye.
Photobucket

Once your oils are smooth and whipped you are ready to add your chilled lye solution. ADD THE LYE SLOWLY! I turn my mixer down to the lowest speed for this and add just a little at a time. After you are sure your lye solution is blended you can add your fragrance oil. I used two ounces of Dream Angels Heavenly Type (BNL) from Bitter Creek for this particular soap, it smells just dreamy! Here is a pic of your oils ready for lye!
Photobucket

After you've got your fragrance and lye mixed in it's time for color! I needed my base to be colored in blue and white to be a smaller portion of the soap. I scooped out the white into a small stainless bowl and set it aside.
Photobucket


Once I have separated my soap I can then color my base, for this soap I used the Blue Rainbow Mica from Bitter Creek North. I used about 3/4 tsp for this batch. Blend the dyes in by turning the mixer back on low until blended well.
Photobucket

Once you are ready, go ahead and mold! I used blue on the bottom, white in the center and blue on the top for a cloud like appearance. You can swirl, layer and do just about anything you can imagine with whipped soap!
Photobucket

Allow your finished soap to set in the mold for about 24 hours. Remove and cut with a wire. Standard soap cutters and knives tend to break pieces off as you cut. Cure this soap for about 4 weeks before selling.

Happy Soaping!
Flicker

Tuesday, January 13, 2009

New Website Coming Soon!


A new year... a new look! We have been working on a new shopping cart system and revamping our entire website for quite awhile now, and we're excited to announce it will be ready to launch soon! We are in the testing phase and are trying to work out the bugs to make it as perfect and user-friendly as possible for you. Our new shopping cart system will include exciting new features such as a wish list, product rating system with customer reviews, online order status & history, online gift certificates, and a new BC Reward Points program! This is our 3rd try at a new shopping cart system, as previous attempts didn't work out for various reasons, so we are hopeful that the 3rd time is a charm! We hope this new website & online shopping system will make our site easier to navigate and provide our customers with a much more enjoyable shopping experience, and we thank you for your patience!
Stay tuned for more info & launch date!

Valentine's Day Ideas!

Candle sales have a tendency to slow down after Christmas, and as you all know the next big gift giving holiday is Valentine’s Day on February 14th. So don’t forget to gear up your Valentine candle line now and be ready to put those products on the shelf soon after New Years!


Aside from the common pink and red candles in scents like rose or cinnamon, try something new this year… get creative and think outside the heart shaped box :) Sweets are great but fattening… so why not give a heart shaped box of sweet smelling votives instead? Scents like Pink Sugar, White Chocolate, Strawberry Cream Truffle, Chocolate Covered Cherry, Caramel Nut, Maple Sugar, etc. Make your own unique blends, or think of creative new names for scents you already have!


Rustic paraffin or palm pillars layered in shades of red, pink, wine and plum make gorgeous Valentine gifts. Try making some mini heart shaped embeds to add a little romance to your containers. Red & pink chunk candles are always a favorite. And don’t forget the icing… frosted pillars with whipped wax are the perfect product to attract a sweet tooth! Your local discount mart should have glass heart shaped dishes that are perfect for 2 or 3 wick candles.


Put some passion in your packaging! Tie some pink or red ribbon on your gift bags, use a heart shaped rubber stamp, or add a sprinkle of glitter to make your products shine. You can find cello bags at gift wrap suppliers online with hearts printed on them. Heart shaped baskets are usually available at some of your local dollar stores or discount marts. The heart is not the only symbol of Valentine’s day… mix it up and add some cherubs and kisses!


Candles aren’t the only hot gift idea for Valentine sales… bath products and home fragrance items are a huge hit! Try selling drawer sachets made with scented beads, corn cob, or herbs. You can use organza bags that come in many pretty colors, or use muslin bags and iron on a romantic design with iron on transfer paper. Or even get some cute printed fabric and sew your own sachets if you’re handy with a needle! Scented pillow spray can be a great romantic gift product and is easy to make. Wax dipped roses are another fun idea to win your customer’s hearts.


Branch out into body products and offer some scented lotions this year to match your Valentine candles… people will love it! Heart shaped soaps are a simple addition that can be a great impulse item on your store counter. And since Valentine’s Day is a kissing holiday, don’t forget the lip balms!


Happy Candlemaking,

Doneen St.John