Friday, August 31, 2018

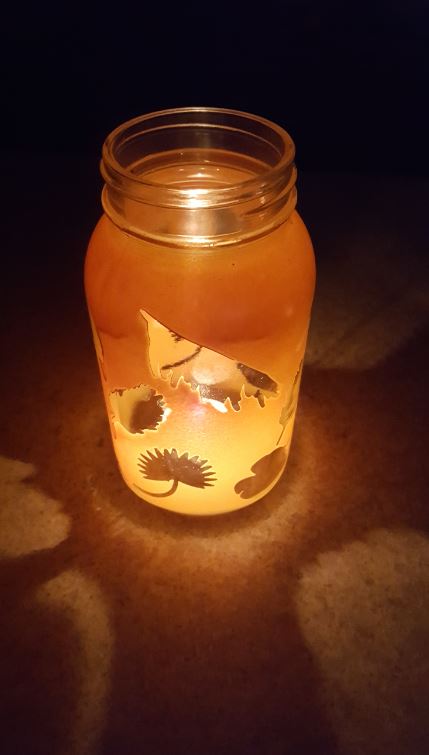
DIY Shadow Jars!

~DIY Shadow Jars~

Finally, a kid-friendly project!
Shadows Jars are a super fun and simple project for kids 
young and old to help with. 
A magical Fairy lantern with a battery-operated candle for a little girl's room, 
or a big glowing jar, casting sparkling firefly shadows for a boy. 


Materials you will need:
-Tea Light (using IGI 4625 wax) or battery-operated candles
-Stickers
-Spray Paint (Paint+Primer spray paint works well)


Take a trip to your local hobby store to select any stickers you desire. Options with a fun outline are a great option.


16oz Straight side Jelly Jars (pictured) are a great container to work with. Make sure that whichever container you use, the sides are flat, for stickers to adhere evenly to. 


Place stickers all along the outside of your container. Be careful not to overlap stickers!


Once all stickers has been applied to the containers, lightly spray paint the complete outsides of the containers, covering the stickers. 
*Note: Spraying the spray-paint in coats every couple minutes help to prevent dripping paint.


Once the paint is completely cooled, carefully remove the stickers from the jars. 
*Note: Using a razor blade to carefully cut around the edges of the sticker, helps prevent part of the paint from being removed when the sticker is being peeled off.


These jars are beautiful on their own, but if you're wanting to add a bit of extra charm, add a piece of ribbon or apply a border, or even a handle around the lid area using a high-temp hot glue gun.


If you choose to use an actual tea light candle rather than a battery operated candle, be sure to center the candle within the jar after the candle has been lit, for even shadow casting.


Beautiful!


If there is a fun Candle or Bath & Body project that you would like to learn about, we would LOVE to hear from you! Please send all requests to info@candlesupply.com. Thank you!
Happy Candle & Soap Making!
-Elya

Tuesday, July 31, 2018

Bronzing Coconut Body Whip!

 ~Bronzing Coconut Body Whip!~

Conquer the dog days of summer with luxurious shimmering body whip!


Materials you will need:
~Glass or Plastic Clear containers (our plastic PET jars would work great)
~32oz Coconut Oil (melted to room temp)
~Large Glass/Metal mixing bowl
~Whisk/Hand mixer/stand mixer


Step 1 - Mix Coconut Oil and Sweet Almond Oil together until well blended. I found that using a simple flat beater attachment on my stand mixer worked well at a medium speed. 


Step 2 - Slowly add your choice of skin safe fragrance oil. I used exactly 1/4oz of fragrance oil and the scent was great. (I used Pomegranate Lemonade). It wasn't too strong, and not too weak. A little goes a long way! Beat well. 

*Note: I switched over to a hand mixer at this point, in order to "fluff" up the mixture more by whipping as much air as possible into the mix. 

You'll notice the mixture turn more white the longer you mix and the oils blend together. You'll also see bubbles start to appear!


Step 3 - Working with Coconut in the hot summer months has its downfalls. coconut oil is a very soft oil, that melts with the simple warmth from your fingers. If the room that you're working in is warm, you may need to put the bowl into a fridge for a few minutes (I left it in for just 5 minutes), to cool the oils back below room temp, in order to start seeing a real "whipped" look as soon as you continue mixing.


Step 4 - Once you start seeing a real "whipped" look to your oils, go ahead and add your Bronze Mica Powder. This is another product where a little really does go a long way. I used just 2 teaspoons of mica to achieve a really nice shimmery shade of bronze (the pictures don't do justice). Be sure to mix thoroughly!


*The mixture was still a bit too creamy (above), so I put the bowl in the fridge for another 5 minutes to achieve the perfect "whipped" consistency (below).*


Step 5 (final step) - Once you've completely mixed all oils and mica together thoroughly, you can simply scoop the mixture out of the bowl with a spoon to place into your containers, or you can put all of the mixture into a gallon size plastic bag, cut a small hole into the bottom corner, and neatly squeeze the mixture into your containers. (This really seemed to cut down on the amount of mess for me.)


 *Note: Since this project is Coconut based, be sure to store in a cooler area (less than 65°F) to prevent the mixture from completely melting!


 If there is a Candle or Bath & Body product that you would like seen made, we would love to hear from you!
Please send your requests to info@candlesupply.com

Happy Body Whip making!
-Elya


Saturday, June 30, 2018

Marble Container Candles!

~Marble Container Candles~
(Made with EZ Parasoy wax)

Put a colorful new twist on plain container candles!


Materials you will need:
~ Container candle making supplies, or already prepared solid colored container candles (I made my own candles made with EZ Parasoy wax)
~ Toothpick diameter 6" piece of wire
~ Bowl of ice water (optional)


Step 1 - Choose your base container candle. When selecting a container candle to marble, choosing a soy blended wax is ideal, due to the softness of the wax. 

*Note: The softer the wax, the more likely the colors are, to fading into each other over time. A 100% soy wax will morph into one color in about a week, losing the marbled look.


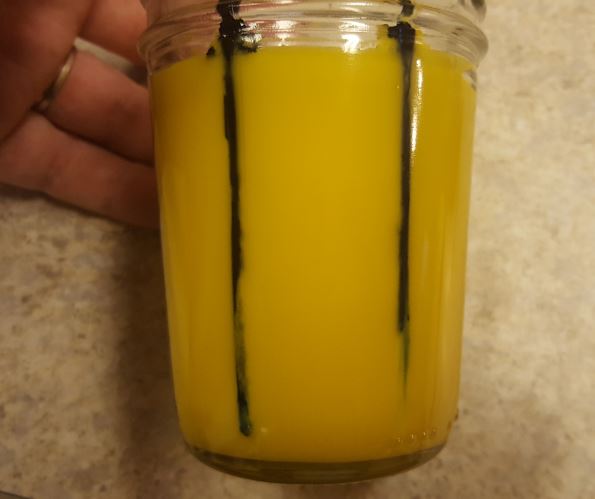
Step 2 - Taking a completely cooled and prepared container candle, use the toothpick diameter 6" piece of wire to poke multiple holes along the glass, until you reach the bottom of the container. It's not recommended to poke too many holes (about 6 maximum), to prevent the dye from flooding the base candle into one new color.


*Note: Make sure to clear all wax from the hole that you have just created. This will allow the liquid dye to disperse easier down the candle. 


Step 3 - Take the liquid candle dye and apply one drop of dye to each hole that you made along the sides of the candle. One drop is all you need to make nice color swirls in the base candle. 


Step 4 - The drops of dye usually do not spread all the way to the bottom of the candle on their own, which is where the metal wire comes into play again. Use the metal wire to follow the original punctures, to force the dye all the way to the bottom of the candle. 


Step 5 - After all lines of dye have been forced to the bottom of the container, use a heat gun to start on one line at a time. Focusing on just one line of dye, slowly follow the line of dye with the heat gun in a sweeping motion back and forth. As soon as you see the wax starting to melt, you'll notice the dye quickly moving along the melted area. 


*Note: This is where I found a helpful trick. Sometimes if heated too much where a bit too much wax is melted, the dye will flood the melted area in a fairly large amount rather quickly. Using a bowl of ice cold water, as soon as you see where the dye is flooding a bit too much, stop the heat gun and quickly place your container candle into the bowl of water just until it is level with the surface of the wax within the container. This will "freeze" the design without morphing your entire candle into one color. 


The marble designs become very pretty, very quickly :)


Step 6 - When you have completed all sides of your candle, you'll see that the surface of your candle is a bit "less than satisfactory". There will be dye, wax bits and a whole lot of uneven surfaces. Wait until the candle is completely cooled, then using your heat gun in a circular motion, heat the candle surface just until the surface is completely flat.


Step 7 (final step) - Once the surface is completely cooled, take a napkin or paper toweling to carefully follow along just above the surface, to clean up any wax or dye for a neat, clean look.


Secure a lid to each candle for the finishing piece. These candles are simply beautiful! 


If there is a fun Candle or Bath & Body product that you would like seen made, we would love to hear from you!
Please send your requests to info@candlesupply.com

Happy Candle Making!
-Elya