Saturday, June 30, 2018

Marble Container Candles!

~Marble Container Candles~
(Made with EZ Parasoy wax)

Put a colorful new twist on plain container candles!


Materials you will need:
~ Container candle making supplies, or already prepared solid colored container candles (I made my own candles made with EZ Parasoy wax)
~ Toothpick diameter 6" piece of wire
~ Bowl of ice water (optional)


Step 1 - Choose your base container candle. When selecting a container candle to marble, choosing a soy blended wax is ideal, due to the softness of the wax. 

*Note: The softer the wax, the more likely the colors are, to fading into each other over time. A 100% soy wax will morph into one color in about a week, losing the marbled look.


Step 2 - Taking a completely cooled and prepared container candle, use the toothpick diameter 6" piece of wire to poke multiple holes along the glass, until you reach the bottom of the container. It's not recommended to poke too many holes (about 6 maximum), to prevent the dye from flooding the base candle into one new color.


*Note: Make sure to clear all wax from the hole that you have just created. This will allow the liquid dye to disperse easier down the candle. 


Step 3 - Take the liquid candle dye and apply one drop of dye to each hole that you made along the sides of the candle. One drop is all you need to make nice color swirls in the base candle. 


Step 4 - The drops of dye usually do not spread all the way to the bottom of the candle on their own, which is where the metal wire comes into play again. Use the metal wire to follow the original punctures, to force the dye all the way to the bottom of the candle. 
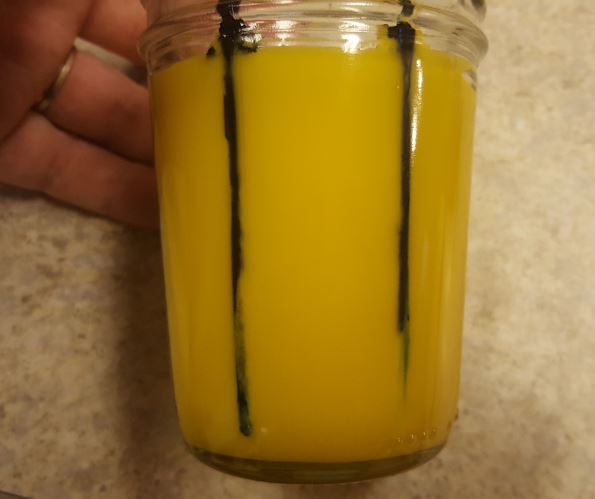


Step 5 - After all lines of dye have been forced to the bottom of the container, use a heat gun to start on one line at a time. Focusing on just one line of dye, slowly follow the line of dye with the heat gun in a sweeping motion back and forth. As soon as you see the wax starting to melt, you'll notice the dye quickly moving along the melted area. 


*Note: This is where I found a helpful trick. Sometimes if heated too much where a bit too much wax is melted, the dye will flood the melted area in a fairly large amount rather quickly. Using a bowl of ice cold water, as soon as you see where the dye is flooding a bit too much, stop the heat gun and quickly place your container candle into the bowl of water just until it is level with the surface of the wax within the container. This will "freeze" the design without morphing your entire candle into one color. 


The marble designs become very pretty, very quickly :)


Step 6 - When you have completed all sides of your candle, you'll see that the surface of your candle is a bit "less than satisfactory". There will be dye, wax bits and a whole lot of uneven surfaces. Wait until the candle is completely cooled, then using your heat gun in a circular motion, heat the candle surface just until the surface is completely flat.


Step 7 (final step) - Once the surface is completely cooled, take a napkin or paper toweling to carefully follow along just above the surface, to clean up any wax or dye for a neat, clean look.


Secure a lid to each candle for the finishing piece. These candles are simply beautiful! 


If there is a fun Candle or Bath & Body product that you would like seen made, we would love to hear from you!
Please send your requests to info@candlesupply.com

Happy Candle Making!
-Elya


Thursday, May 31, 2018

Epsom Salt Scrub Bars!

~Epsom Salt Scrub Bars~
(Made with Clear M&P Soap Base)

Sit back and relax with these stress-relieving Epsom Salt Scrub bars!


Materials you will need:
~ Clear Melt & Pour Soap Base (This base is also VEGAN!)
~ Medium Microwave-safe bowl


Step 1 - Cut soap base into 1" cubes along score lines. Fill a medium microwave-safe bowl with the cubes and heat for 30 seconds at a time, while stirring well after each heating until the base is fully melted (an entire 2lb tray of soap takes roughly 3.5-4 minutes to fully melt). 


Step 2 - Once the base is fully melted, add your choice of FD&C dye to the desired shade of your choice. These dyes turn out very nicely! Stir well.

*Note: each block of base is 2lbs. I split the block and colored each lb a different color. 1lb of base makes nice size soap bars when using the ribbons mold.


Step 3 - Once your base is colored, add 1/8 cup of Epsom Salt per lb. of base and stir well. If you add too much salt, the bars will not hold together properly when removing the bars from the mold. 

*Note: The Epsom Salt will sink to the bottom of the base once added. This can not be avoided, however this is what makes up the nice designs on the finished bars. 


Step 4 - Add fragrance oil to the base. 1lb of base will need 1oz of skin safe fragrance oil. The Wild Watermelon fragrance smells amazing and is perfect for summer!


Step 5 - Pour the base into clean soap molds and allow to cool for at least 3 hours at room temperature before attempting to remove from the molds. 


Step 6 (final step) - Remove from molds and package in cello bags or plastic wrap. 


~


If there is a fun Candle or Bath & Body product that you would like seen made, we would love to hear from you!
Please send your requests to info@candlesupply.com.

Happy Soap Making!
-Elya


Saturday, March 31, 2018

Spring Flower Wax Melts!

~Spring Flower Wax Melts~
(Made with EZ Parasoy Wax)
 
With Spring time finally here, flowers seem to always be the main focus when it comes to
spring-themed items; and for good reason!
Brightly colored, fresh picked vibrant flowers are the perfect pick-me-up
after a long cold winter season.
Speaking of brightly colored flowers, this month we're going to focus on adding a new look to those ever so popular clamshell wax melts. I've never personally seen wax melts like the ones you're about to see, so I thought it'd make for a fun and easy blog to kick off the month of April.


Materials you will need:
~ Candle Dye (I used the liquid dyes)
 
 
Step 1 - Heat the wax to 180-195°.


Step 2 - Once the wax reaches desired temp, add your fragrance oil (I used 1oz fragrance to 1lb of wax), blend well. Then add your choice of candle dye and again blend well. Preparing your wax embeds that will set on the surface of the initial poured clamshell, will be the main focus at this point. I used the Purple/Violet Liquid Dye for the top flower embeds, and Hot Pink/Pink Liquid Dye for the base color. I also used the popular "Apple Flower" fragrance oil for these.


Step 3 - Allow the wax to cool to a temperature of 130-140° to make sure that the heat of the wax will not melt the clamshell molds. A melted plastic mold makes for a mess!


Step 4 - Once the wax has cooled to the desired temp, start carefully pouring the scented/colored wax into the embed molds. These will cool rather quickly compared to the larger clamshell base that you will be pouring shortly. Set aside to cool.


*Tip: Setting the embeds in the fridge for a few minutes helps greatly with the molded embeds to release from the mold with ease. If taken from the mold too soon before the embeds are too warm, the embeds are likely to break apart (as shown below).  


Step 5 - Repeat steps 2 & 3 to prepare the clamshell base color. Go ahead and pour the melted wax into the clamshells.


This is where a scale really comes in handy. The 6 cavity clamshell molds will hold 2.5oz of wax. I first filled the clamshell mold until it contained 2.2oz of wax. As soon as your base wax has been poured, take a cooled embed and gently set the embed in the center of the mold within the freshly poured hot wax. Each poinsettia embed weighs .3oz. After you have added the flower embed to the clamshell, you will have a perfectly filled 2.5oz clamshell.


Step 6 (final step) - Set entire clamshell aside to completely cool at room temperature for a few hours. Do not set in the fridge to cool! Cooling the wax too quickly will cause cracking and possible sink holes within the wax. When the clamshells are completely cooled, shut the lid of the clamshell, apply a warning label and you're done!


If there is ever a fun Candle or Bath & Body product that you would like seen made,
we would love to hear from you!
Please send your requests to info@candlesupply.com.

Happy Candle & Soap Making!
-Elya


Wednesday, February 28, 2018

Brand NEW 4oz Mason Jar Candles

~Brand NEW 4oz Mason Jar Candles~
(Made with EZ Parasoy wax)

Bitter Creek has just released a brand new 4oz mason jar!
Since the 8oz mason jars are quite popular, when we came across a smaller 4oz,
we just couldn't resist adding them to our line.
These 4oz jars have the same attractive measurements along the sides,
and are the perfect size to fit right in your hand!
I wanted to show just how attractive these jars are,
so I used the EZ Parasoy wax to help bring out all of the designs when the jars are
filled with a range of different colors.

Materials you will need:
~ Lids (I used the Antique Pewter Lids)
Step 1- Heat the wax to 180-195°. Once the wax reaches desired temp, add your fragrance oil, blend well. Then add your choice of candle dye and again blend well. I personally like to use the Liquid Candle Dyes, as it's fairly easy to achieve specific colors, depending on the amount of dye drops you use each time. With Easter coming up, I used only 1 drop of each dye in each candle, to achieve nice light "Easter" colors.


Step 2- Pour scented wax into jars. This wax should be poured between 165-180°. You will find that this wax will not adhere to the jars under normal circumstances, but instead it will pull away.


Step 3- Place Black Round Wick Centering Tools on jars and secure the wicks, to keep the wicks centered as the candles cool.  


*Note: You'll notice that the EZ Parasoy wax usually leaves a buttery smooth surface after the wax has cooled, rarely ever needing a second pour (if anything, I'd suggest using a heat gun for a couple seconds to smooth a rough surface). You'll also see that this wax does not frost, and rarely ever cracks. The cold and hot throw is amazing and its ability to hold light to bold colors is brilliant!


Step 4 (final step)- Once completely cooled, remove the centering tools, trim the wicks using a scissors, then secure a lid and safety label. Perfect candles!


If there is ever a fun Candle, Soap, or Body product that you would like to see made, we would LOVE to hear from you! Send us a request at info@candlesupply.com today!
Happy Crafting!
-Elya 


Wednesday, January 31, 2018

Natural Paw Balm for pets!

~Natural Paw Balm for pets!~

While experiencing all of the wonderful things that winter has to offer, there are bound to be a few things that are not so pleasant. 
The below-zero temperatures, the harsh winds, and of course.. 
the dry skin that winter often causes. 
One thing that is often forgotten, is that your pets are in no-doubt experiencing the same. Pets are like family and are not always able to care for themselves in all of the ways we sometimes think they can. This often includes... their paws. Have you even seen a dog come inside after running outside in the snow for any amount of time, only to be frantically licking their cold feet and relieving them of the ice chunks that have gathered between their toes? 
Just like humans, pets can have dry cracked feet that can be sore just the same. 
Icy conditions from the outdoors can have damaging affects to a pet's paws.
Paw Balm is a fantastic solution to those drying, skin-irritating conditions, and we have a fun recipe that will help keep your pet's paws soft, protected and moisturized.


Batch yield - (5) 4oz PET Jars

Materials you will need:
~ 1oz Castor Oil
~ (5) 4oz PET jars 


For the first step, empty all of the lip balm base into the 1lb pouring pot. 
*Tip: Melting the base for 30 seconds at a time in a microwave worked well to loosen in from the plastic container a bit beforehand, really helped with removing all the base without having to struggle with chipping it out with a spoon. 

1lb Pouring Pot


Fill a small pot roughly 1/4 - 1/3 way with water. Using a simple Double Boiler maker, set the pouring pot filled with the lip balm base, within the pot. This method will allow the contents within the pouring pot to gradually reach an even temperature, without having the pouring pot sitting directly on the bottom of the pot.


 Double Boiler Maker


While using LOW to MEDIUM heat, melt all of the base within the pouring base. Do NOT boil the base! 


Once all of the base has melted within the pouring pot, remove the pot from the heat and gradually add the Coconut Oil, Castor Oil and Sweet Almond Oil, while constantly mixing. 
*Tip: The Coconut Oil will be hard within its original bottle at first. To melt the coconut oil to be able to pour into a measuring spoon, setting the bottle within a bowl of hot water speeds up the process of melting the oil rather quickly within just a few short minutes. 


As soon as all oils are completely blended within the base, allow the mixture to cool between 135°-140°F before pouring it into the 4oz PET jars. A digital thermometer is really handy for this!


4oz PET Jar


Let the jars sit for an hour or so to harden before putting the sealing discs and lids on.


You're all done and your pets will thank you!


This paw balm recipe is non-greasy and is perfect for pets. This balm should be applied liberally as needed, for prevention or treatment of dry cracked paws. 
You will see the balm working immediately as a wonderful moisturizer.


 A few fun facts about the ingredients of this recipe:

*The lip balm base that Bitter Creek offers already contains numerous wonderful ingredients including the following by itself:
   
   -Vitamin E Oil: Vitamin E is an oil-soluble nutrient and is hence heavier than water-soluble              products. It restores the lost moisture, and this is why it works best for dry and damaged skin.
   
   -Beeswax: Beeswax helps keep snow and ice from gathering on the bottom of your pet's paws, preventing discomfort.

   -Shea Butter: *Moisturizing: The concentration of natural vitamins and fatty acids in Shea butter makes it incredibly nourishing and moisturizing for skin. It is often used to remedy dry skin and to help protect the skin’s natural oils. *Reduces Inflammation: Shea Butter has been found to reduce skin inflammation and even potentially help avoid skin mutations. *Nourishing: Shea butter has been known to protect and nourish skin to prevent drying, and even has been proven to soften skin over time.

   -Cocoa Butter: *Cocoa Butter is known for having numerous benefits. Just a few of those benefits include: Prevent drying and peeling of skin. *healing chapped skin, soothing burns, rashes & infections. 

   -Soybean Oil: Soybean Oil is a vitamin-rich emollient that absorbs well into the skin. Soybean Oil has a nourishing, softening and moisturizing effect on skin.
  

*We added Coconut Oil, Castor Oil & Sweet Almond Oil for even more added benefits:

   -Coconut Oil: Coconut oil is naturally antibacterial and anti-fungal, as well as an excellent moisturizer.

   -Castor Oil: Castor Oil penetrates deep into the skin, fighting bacteria overgrowth that can clog pores, while softening and hydrating irritated skin at the same time.

   -Sweet Almond Oil: Almond oil is light in texture, and can easily penetrate deep into the skin, softening and dislodging dirt and debris accumulated in the skin pores and hair follicles.  


If there is ever a fun Candle, Soap, or Body product that you would like to see made, we would LOVE to hear from you! Send us a request at info@candlesupply.com today!
Happy Crafting!
-Elya