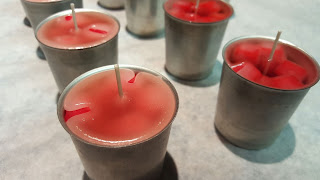
Mini Chunk Votives!
I received quite a few requests, to make a blog on these little cuties. As soon as extra time came up over the weekend, I decided to whip up a small batch :)
These Mini Chunk Votives have been one of my long-time favorite items ever since I first started making candles. The inspiration for these, came from the larger Chunk Pillar candles that I absolutely love making.
Let's get started!
Materials you will need:
*Candle Dye (I used the Red/Dark Pink Liquid Candle Dye)
*Fragrance Oil Droppers (Optional, but oh so handy!)
*Fragrance (I used Cranberry fragrance)
*Glass measuring cup (I used a Pyrex 2c. measuring cup)
First, start by melting your wax to 190-200*.
Melting IGI 1343 wax
While I'm waiting for the wax to reach its desired temperature, I start prepping my votive molds right away. I don't use any sort of wick adhesive so the wick to keep the wick from moving, since it stays put by itself with a bit of help from the wax chunks (that will be explained shortly).
15hr. Metal Votive Mold w/ wick
Once your wax reaches its desired temperature, I start by making the wax mixture for the mini wax chunks. Measure out 8oz of wax in your glass measuring cup. Once you have measured 8oz of wax, add your candle dye (I used 6 drops of dye for 8oz. of wax to get that nice "cranberry" color). Be sure to blend well! There's nothing worse than wanting an even colored candle, then having it turn out with large dark spots from the dye not mixing in (see below). I usually take an extra minute to make very well sure, that the dye has mixed in 100%. :)
Melted wax with Dye that is NOT fully mixed yet
After you have fully blended the candle dye into the wax, go ahead and add your fragrance. I have always added fragrance at 6%, and it has always worked wonderfully for me. If you are using Cranberry fragrance, I recommend using that amount.
Once your wax, dye and fragrance mixture is ready, carefully pour the wax into each cavity of the silicone chunk tray mold.
*Tip: Each cavity of the chunk tray mold, is fairly small. It is extremely difficult to pour the hot wax directly into the mold, from the glass measuring cup, without making a HUGE mess. This is where the plastic fragrance droppers are extremely handy (see below). Use a fragrance dropper to fill the mold cavities with the hot wax, making clean-up a breeze! Trust me, you will be extremely grateful that you have these!
*Tip: These small cubes also make incredible gifts for a wax melt lover :)
Mini Wax cubes
After you've got your wax cubes done, and your metal votive molds all ready to go, start filling the votive molds. As you drop the cubes in, hold onto the top of the wick with one hand, then after a few cubes are in, they act as a wick holder, keeping it nicely in place. I like to fill the molds just a bit under the surface. This gives me room later on, to top it off with a second pour, for a smooth finish.
A Metal Votive Mold filled with Mini Wax cubes
Fresh over-pour over Mini Wax cubes
Now, some may like to leave their Votives with "chunky tops", with the wax cubes sticking out a bit. I do like this look, however I started topping my Votives off for a smooth look, so they look more uniform to one another.
Votives that have been topped off
Being a fairly small item, there are many fun and easy ways to package these for individual sale, or in gift sets. I packaged this votive in a 4x6" clear cello bag, while securing the top with a Silver Metalic Twist Tie. I finished the look off with the the last final necessity... a small Votive Warning Label.
Talk about cute! These Votives cool extremely quickly, which makes them a pretty fast project. I've never seen one of these on a store shelf, but I can imagine they would do well with how appealing they are. :)
I hope this blog has come in handy to some who were wanting to see how these were made. If there is ever a fun candle or Bath & Body product that you would like seen made,
Please send your requests to info@candlesupply.com. :)
Happy Candle & Soap Making!
-Elya


