Friday, June 29, 2012

Christmas in July!

I'd like to consider it Christmas in July! With the holiday season fast approaching I thought I'd bring back a project, a darling electric candle PERFECT for the holiday season!!! There are so many great cookie cutters you can use and so many awesome scents to coordinate this is a great product for all your upcoming holiday shows!Most of the "Electric Grubby Candles" being sold today are made from silicone molds, but you can make them with just a regular candle mold as well.  These beautiful candle lights are a fairly simple project but can get "messy" and are time consuming. The results are fantastic and WELL worth the time and effort! This particular electric candle will easily sell in my market for between $25-30!

What you will need to make this:
Getting Started!

Prepare your work surface covering anything you do not want wax on! This can get messy! 
 
Once you get yourself set up, begin melting your wax. For our mold it took about 3.5 pounds of wax (by weight). Once your wax is melted, add 3.5 tsp of the mold release powder, and 3.5 tbsp soybean oil to the wax.  Allow additives to melt and blend well. 

Prepare your mold by plugging any wick holes with mold plugs and covering those with mold sealer putty to prevent leakage. Spray the inside of the mold with silicone mold release.  Bring your melted wax up to 200*F and pour the hot wax into your molds. (We poured our candles into a sink so that they could be rapid cooled by submerging the candle mold into cold water. This will allow the candle shell to cool much faster.)
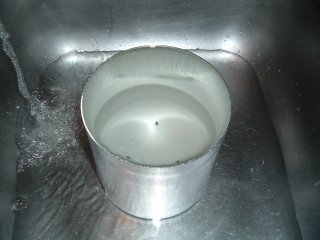
Empty Mold
Filled Mold Cooling
 
Once your candle has a visible shell up the sides of the mold of about 3/4" thickness, remove the mold from the water. Take a butter knife and remove the skim of wax from the top of the molds and pour the remaining wax back into either your Presto Pot or your Pour Pot.

Wax In Mold Ready
Taking Skim off Wax
 
 
Allow shell to fully harden and carefully remove it from the mold.  
Top View Finished Shell
Side View Finished Shell

Using an exacto knife, cut a hole in the bottom of the shell near an edge.  This hole must be big enough for the electrical plug of the candle lamp to fit through it.  Make sure the plug fits through the hole before moving on to the next step.
Cutting Cord Hole
Cutting Cord Hole
 
Now, take about 1 pound of the leftover wax you have melted and heat it back up to about 175*F.  Add 1 teaspoon of vybar 103, two of the Christmas Green Dye chips and 1 oz of Mistletoe Fragrance oil and blend well.  Allow the wax to cool and form a "skim" of wax over the top and begin using your wire whisk to "whip" the wax. 

Once your wax has been whipped to the consistency of frosting, use your butter knife to "frost" your candle shell with the whipped wax until you have it well coated.  
Applying Whipped Wax
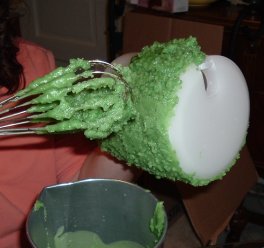
The cut out shapes must be done quickly before the whipped wax fully hardens.  Set the shell on a level surface, holding one hand inside the shell, use the other hand to press the cookie cutter into the front side of the shell.  Press firmly through the whipped wax until you feel the cutter hit the solid shell, then stop.  Remove the cutter carefully, then very carefully peel the wax shape out.  You will be left with a tree shaped cut out for light to glow through!

Next just set the candle lamp inside the shell, and run the cord through the hole.  You are done!
Finished Lamp


Creative Decorating & Packaging Ideas:

  • Try adding a little glitter or mica to the finished project for added sparkle!
  • Tie some homespun fabric around the candle for an added primitive touch!
  • Get creative with cookie cutter shapes, colors and fragrances.  Try a gingerbread man cut out with some spices sprinkled on the whipped wax!  How about making the shell a pastel blue, and using white whipped wax, glitter, and a snowflake cut out and scenting it Frost Bite or Jack Frost?
  • Electric Grubby Candles look great packaged in a clear cello bag tied with ribbon, raffia, twine or yarn!
  • These make cute night lights!


Happy Candlemaking!
Have a safe and happy 4th of July!
Flicker

Tuesday, June 12, 2012

Celebrate Independence Day!

This month marks two things, The 4th of July & the Free Sample of NGI Waxes
Free Wax Sample!


All orders of $100 or more are eligible for a FREE 1lb sample of one of the following waxes!
    
EcoSoya™ CB-135
    
EcoSoya™ CB-Advanced Soy
    
EcoSoya™ CB-XceL™
    
EcoSoya™ Pillar Blend

Supply is limited! One sample per customer. Please make your wax request in the comments section during checkout. 

This made me think that maybe it was a good time to do two things, a blog about an NGI wax, something I haven't done in a while AND something fun for the 4th! So, I thought, I love layered jars! LOVE them! And making them from soy is SO easy and Red, White and Blue candles for the 4th are great! Actually all summer, especially in Texas! 


Set out your supplies


Add your Wick Stickum to your wick,


Place in your jar


add your wick holder


Heat your wax to 175 and add your fragrance.

In a pour pot do the following for each layer: (I made this candle by the layer....but I melted and scented the wax for an entire batch at a time. I use 1 weight oz of scent per lb of wax.)

For the first layer, I used 2.2 weight oz of wax/fragrance and Blue Dye


For the second layer I used 2.4 weight oz of wax/fragrance mix with Red Dye


and for the third and final layer I used 2.5 weight oz of wax/fragrance and no dye


I waited until the wax was just starting to thicken to pour, probably around 100*, Keep the wax moving in the pouring pot so it does not stick to the sides when doing this. This makes the layers faster to pour as it is nearly cooled by the time the layer is poured. Wait about 1/2 hour between layers. This candle can be altered to fit any scent/color combination you can imagine! I've had excellent success selling layered candles over the years. :) Just use your imagination and creativity and anything is possible!

Tuesday, May 29, 2012

Fathers Day, Wick Your Wax and Tea Lights!


Wick Your Wax scents are on sale this month at Bitter Creek. I know many of our customers have never tried them and if you haven’t this is the PERFECT opportunity for you to give them a whirl! Wick Your Wax Spring Sale! All Wick Your Wax fragrances on sale this month for $2.00 off per pound or $1.00 off an 8 oz bottle!

What makes the Wick Your Wax fragrances different? They are concentrates. The regular line is double strength, meaning if you normally use 1 weight ounce per pound of wax, with these you will use ½ ounce per pound. The Top Shelf Wick Your Wax scents are even stronger!!! When using the Top Shelf, I recommend starting at 1/3 ounce per pound of wax! When comparing the cost, in most cases, using the more expensive WYW scents actually saves you money!

So many men are not huge fans of candles, and soaps or anything they deem “Fru-Fru” but I find men like things that indeed are manly and smell nice both! Three of my top selling “man scents” are Tuxedo from the WYW Top Shelf & Sage & Citrus from the regular Wick Your Wax line have been a hit with my personal male clientele for a decade!  Try these scents Soap, Man Candles, Lotions and Body and Room Spray! Perfect Storm has been a consistent seller for me in Candles, Room Sprays and Incense! I have chosen to use this scent this month for a tutorial on how to make Tea Light Candles.

Supplies List:
Wick Your Wax Perfect Storm
Blue Liquid Candle Dye
IGI 2281 Straight Paraffin with 1/2 tsp per lb of wax Vybar 260 OR IGI 4794 Votive Blend. Both work excellent! I used the IGI 2281 and Vybar for this.

Directions:

Weigh out the amount of wax you need on a digital scale. For 1 dozen candles, you will need to melt 6.5 weight ounces of wax. You can do this in a double boiler, a Presto Kitchen Kettle or a commercial wax melter. Heat the wax to 180*


While your wax is melting, place your Tea Light cups together and straighten and set your wicks near them.


Weigh out your fragrance oil and add your dye. For this I used one drop of Blue. The more you add the darker it will be. I used .2 weight oz of WYW Perfect Storm and 6.5 weight oz of wax. I do this directly in to my pouring pot.


Once your wax is up to temperature (check with a thermometer), remove it from the heat and place in a pouring pot if it isn’t already. 


If you used your pour pot to melt the wax, set it on a digital scale and use the tare feature to zero out the weight and weigh in the fragrance and add the dye as done in the previous step. Stir well.


You are now ready to pour the candles. Pour each candle about 3/4 full and insert your wick.


Allow the candles to cool until they are solid but pliable and adjust the wick. Be careful not to pull too hard or you can pull the wick out of the tab. Let the candle continue to cool until you are ready to do a final pour


Re-heat your wax using a double boiler. Be sure to re-position the wicks so they are centered. Heat to 185* and re-pour the tea light until it is just full.


Allow the candles to fully cool and package.

We sell a variety of great packaging for tea lights. Clear and Frosted boxes and Clear Tubes! 

Here is an example of our Clear Tea Light Box filled! These are a great seller!


Monday, May 14, 2012

Wicks. Wicks. Wicks.

With wicks on sale this month I started thinking about how many questions I get every week with regards to wicks, wick size, testing wicks etc.. This month I decided to change my blog a bit to explain and also show you what a candle that burns correctly should look like and act like both.

How do I know what kind of wick to use in my candle? Wicking is tricky. In fact probably the most difficult part of making any candle. My rule of thumb is to wick first according to manufacturers recommendations but then also based on my own physical testing. I have tested at some point every wax we sell and every type of wick, although not all of them together.

In my experience candles that are made from a base of paraffin wax; Straight Paraffin, Blended Paraffin and Single/Reduced Pour Paraffin waxes tend to do the best in "most" cases with zinc core wicks. What does that mean? Well, for Pillar or Taper style candles, made from paraffin, a zinc wick isn't my first wick choice. I find Flat Braid Cotton or Square Braid Cotton wicks tend to work better for those types of candles. For a Tea Light candle, my preference is also for a cotton wick. In this case, a coreless braid but one already tabbed. For most paraffin containers, I prefer zinc core wicks. I find that they burn slower and because paraffin wax burns out, then down...this works best. On that note, many people don't like zinc core wicks personally (and that is OK! This is what trial and error testing is all about folks!) and use LX, HTP, CD etc. in their containers or votive candles. As long as it burns correctly and safely it's the right wick for you!

Soy Candles are a completely different animal versus those made from traditional Paraffin. Wicking a Pure Soy Wax, a Blended All-Vegetable Soy Base Wax or a Paraffin & Soy Blend, you will need to wick according to the soy in the wax. Soy is a lot more viscous and creates a more difficult burn situation than say a straight paraffin wax. Soy instead of burning out then down like paraffin also burns down before spreading out. If your wicks are not hot enough, the wick can not handle the down before out. For any wax with soy, zinc wicks are not recommended. Zinc can tend to fizzle out and stop burning out of nowhere, even if they had previously worked in the same combination for years. For any container (or tea light and or votive) candle with soy, my first choice is the CD series followed by the following in no particular order: HTP, ECO, LX, RRD, Performa, Paper Core.Wicking Pillar Soy is a bit tricky but I have found the Square and Flat Braid Cotton work well for me!

With ANY candle and ANY wick and ANY wax (yes, I meant business there!) you have to keep your wicks trimmed, burn for the proper amount of time for your container and be sure to TEST, TEST & TEST! The ideal burn for any jar candle is after 4 hours your melt should be between 1/4" and 1/2" deep against the glass (this may take a few burn cycles to get to, but as long as you see it by the third burn and the first two are VERY close, you should be good). If you are following this guideline and trimming your wicks before each burn (1/8" for soy and 1/4" for paraffin) you should also have very minimal soot and smoke, even near the end of the burn! Remember it IS all about the wicks. Wicks make the candle burn either correctly or incorrectly. The wicks create the melt pool which is where scent comes from. The wicks are what will either make a safe or unsafe candle while burning.

Bitter Creek Candle Supply offers one of the largest selections of wicks in the industry! Have a question about a wick? Can't decide which wick will be best for you? Need help selecting a wick? We offer FREE Technical Support to all our customers! Online help is available 9am to 5pm Central Time Monday through Friday. Click here for information on how to contact Tech Support by phone, e-mail or through our Live Online Chat Application! Real candlemaking advice from a working chandler with over a decade of experience in the business!

*We can only offer recommendations as to wick sizes and applications, but we cannot guarantee any certain wick to work in a certain application because of too many variables involved. The only way to determine the appropriate wick selection is by experimentation. Test burning will be necessary to determine the best wick for your candles! For testing, we offer for purchase, sample packs that contain 5 of each size wick within a series.


The candle in the photo above was made by me, Flicker. It is made from IGI 6006 which is a Paraffin & Soy Blend. It is poured in our 8 oz. Jelly Jar, colored with liquid candle dye and wicked with a CD series wick. That is taken after the candle has burned 4 full hours. This is what an ideal burn looks like.


Monday, May 7, 2012

Falling forward to Fall shows!

I tend to think a few months ahead in the game of making and selling candles and body care. I am a wholesaler for the most part. My shops are buying ahead sometimes 4-5 months! I am already putting the finishing touches on my Christmas line. This year I've decided to add Pinecone Fire starters! They are SO pretty and smell SOOO good!

Simple directions for this quick and profitable item!

You will need Wax (I used the IGI 4625 but any hard paraffin wax will work!)
Dye (I used Burgundy Liquid Dyes)
Fragrance (I used Mulled Cider, mmmmm! Such a yummy scent!)
and Wicks or String! (I used zinc core wicking)


Melt your wax. While the wax is melting wrap wick pieces around the cones to use as holders while dipping. They will also be the way the cones are lit later on!


Take your pinecones and dip them into the wax to form a base. I did this before adding the color and scent but that really doesn't matter. Just be sure the wax is hot 175-185* so that it will penetrate the cone to leave a nice solid base for the latter layers to adhere to.


Set aside the cones on wax paper to cool.


Now with scented and colored wax if you did not in the last step, allow the wax to slighly cool so it will build up vs. melt off the pinecone...dip, allow to drip off and set on the wax paper to cool.


Repeat the process until you have achieved your desired look.


These are pretty and sell easily at fall and winter shows! Average prices are $9-15 for a bag of 9. Use different colors with different scents. Also a great way to use up extra wax!!!! The better the packaging the more they will sell for! Include instructions and have some out for people to sniff!!!